
Microsoft Word provides numerous formatting options to suit different document needs. Often the general setting will suit most users but other times you may find the need to change page size and orientation in Word to design a different document like an application form, certificate, or brochure.
Normally, the default format would be “letter” which is the standard size for a page (8.5 x 11 inches). This size is easy to work with and print since it fits into any printer or copier. If that is what you would wish to use, there is no reason to learn how to change size and orientation of one page in Word.
Orientation is restricted to portrait and landscape. You could refer to them as vertical and horizontal. When the page is vertical that is portrait orientation, which is usually what most document orientation is and when the page is horizontal, then it is a landscape, that is more common with brochures and other similar documents.
Experts who deal with documents will always advise that certain settings are set before you start working on a document. The reason for this is that it will ensure consistency in the appearance of the documents. You can give your documents a professional touch by having the right size and orientation.
There are however other settings that you need to adjust as well. These include header, footer, margins, and page numbering. These can be set depending on the document you are designing and the settings can be saved as a template.
Setting the size and orientation is a great way to come up with a customized document appearance unique to just your organization.
Now how to change page size and orientation in Word? Before you change page size, confirm that you have access to a printer that can print your preferred size. Once that is done, be sure again that the size you want is not already set as the default.
With your new document open, click on Page Layout in Word.
From the drop-down menu that appears, click size.
Another drop-down menu will appear with several page sizes. The sizes have names and the dimensions below. Choose your preferred size.

If you do not see the size you prefer, you can customize your own page size.
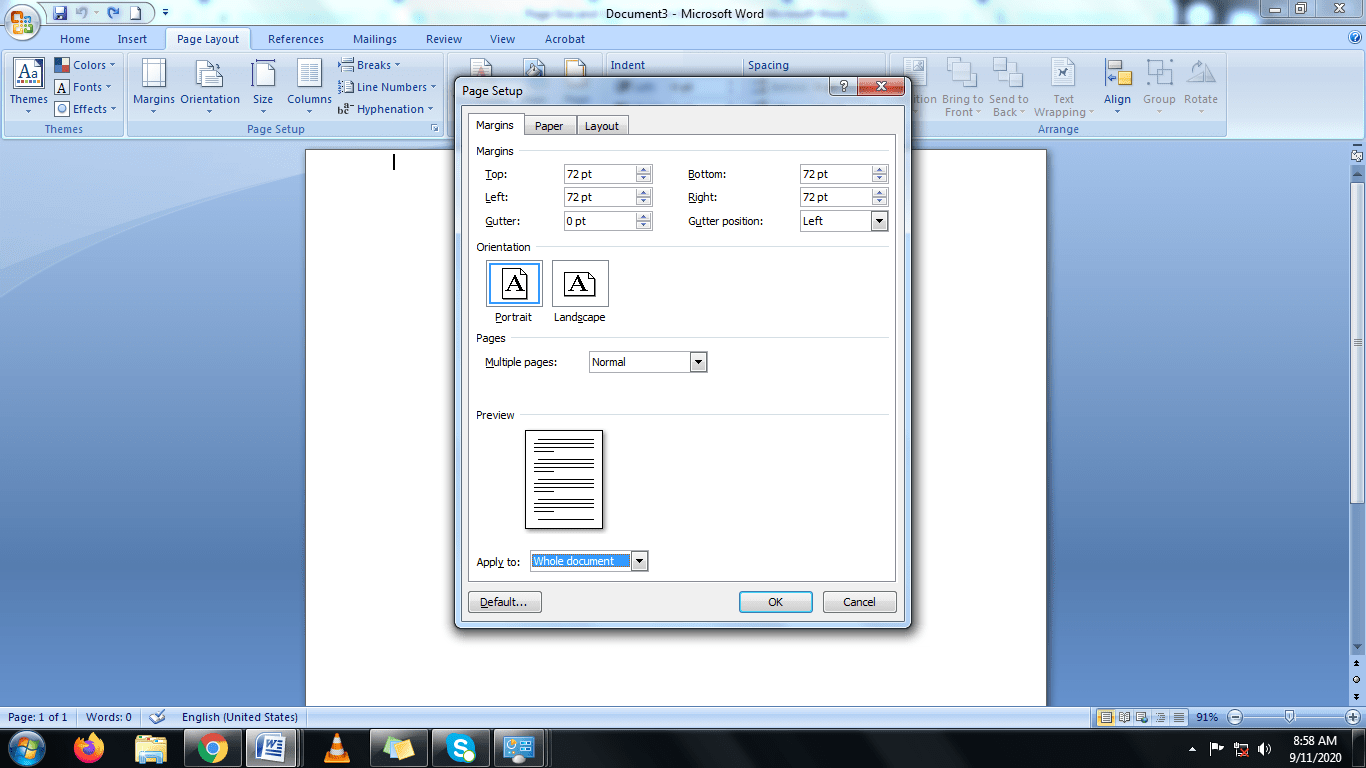
At the bottom of the drop-down menu, click on More Paper Sizes to reveal a dialog box headed “Page Setup”.

On the dialog box, choose custom size and enter your desired values for Width and Height. Click OK and the size will be changed to your preference.
Remember, there are 2 options for page orientation in Word. If you have never made changes to your page, then it will be in portrait and you want to change to landscape.
Click on Page Layout and a drop-down menu will appear.
On the drop-down menu, choose Orientation.
Another menu will appear with the option for Portrait or Landscape. Choose the orientation you want.

The orientation will change immediately.
As you change the page size and orientation in Word, you may also want to adjust the margins. This is the space just before the text and after the edge of your page. The normal setting for a margin is a 1inch space between the text and the edge of the document. This space can be adjusted to suit your need.
A user can choose from predefined margins, or they can set their own margin. The predefined margins include Normal, Narrow, and Moderate.
Narrow space is 0.5 inches all around while moderate is 1 inch at the top and bottom, 0.75 on the sides. As you change the margin size, you will discover other options and their sizes.
Click Page Layout while in Microsoft Word and the menu will dropdown.
Click on Margins and it will reveal different margin options with icons of the appearance as well as measurements.

Choose the predefined margin size you want and the margin dimensions will change immediately.
If you would rather create a customized margin, then skip step 3 and continue to 4.
Scroll to the bottom of the margin options and click Custom Margins.

In the dialogue box that appears, enter the values you want for top, bottom, left, and right.
Look at the preview and if it appears as you would like it to, click ok and the margin will be changed.
Your document has a ruler on the top boundary and another on the left. These rulers can also be used to adjust the boundaries of the document. It may take more concentration to do this and that is why most people choose to use the methods described above. However, if you prefer to use the ruler, here are the steps to follow.
Ensure that the rulers are displayed, on at the top, and another on the left of the page. If it is not, click the icon just above the scroll up arrow on the right of the page.

Use the horizontal ruler to adjust the left margin. Dragging it to the left will reduce the margin and dragging it to the right will increase the margin.
Using the same ruler, you can adjust the right margin by clicking on the right pointer of the horizontal ruler and then dragging it to the right to reduce the margin or to the left to increase it.
Use the vertical ruler on the left of the page to adjust the top and bottom margins. Click on the top pointer and drag it upwards to reduce the margin and down to increase it.
To adjust the bottom margin, click the pointer at the bottom of the vertical ruler and drag it upwards to increase the margin and downwards to reduce the margin.
When you click margins on the Page Layout menu, you will notice that there are different options of margins and they have names. Knowing these types of margins makes it faster to adjust the margins according to your need.
Mirror margins are used when printing a document on two sheets. Both pages will have the same margin dimensions. This means the page on the left has the same values as the one on the right. This type of margin is appropriate when printing on both sides of a sheet. It ensures that the way the text appears on one side will mirror the opposite one.
If you intend to bind the pages of a document, then gutter margins are the right choice. This setting will provide additional space on the side or top to allow binding without affecting the text on the page. When you choose this type of margin, word will set the value at 0” and the user will determine the best-suited value for the margin. You must know how much space will be needed when binding.
This margin type provides a lot of space all around the page. It can be used appropriately when writing a poem or a greeting card. Word provides a standard measurement, but the user can still adjust it even more.
This is the opposite of the wide margin as the margins are thinner. It makes it possible to maximize space usage. You can use this type of margin if you will not bind the document in any way.
As the name suggests, the margins are neither wide nor narrow. It is the middle ground. Word setting is 75pt all around but you can still adjust it accordingly.
That is the standard margin. Most people are comfortable with normal margins. Some countries may have different values for normal margins.
You can choose to adjust these settings before you start to add text to the page or you can do it after. However, after adjusting the settings, check the preview settings to ensure the page appears as you want it to. It is also advisable to see what it will look like when it is printed. Some settings may make it hard to print the entire page on a particular printer or a size of paper. Print preview makes it possible to see what it will look like when printed.
Know more about how Windward and MS Word can make your reporting and document creation process a breeze.
If you've just discovered us, we're excited. Try Windward with our 14-day free trial and start creating documents in quick time with our low/no code solutions.
Adds various capabilities such as inequalities,descending sort, joins, and other functions.
If you've just discovered us, we're excited. Learn more about Windward document automation software now.
Try Windward with our 30-day free trial and start creating documents in quick time with our low/no code solutions.
SQL Select Debugger
If you've just discovered us, we're excited. Learn more about Windward document automation software now.
Try Windward with our 30-day free trial and start creating documents in quick time with our low/no code solutions.
Added a Query tab as a field for typing or pasting in a select statement
If you've just discovered us, we're excited. Learn more about Windward document automation software now.
Try Windward with our 30-day free trial and start creating documents in quick time with our low/no code solutions.
All tags using that Data source will be automatically updated with that name.
If you've just discovered us, we're excited. Learn more about Windward document automation software now.
Try Windward with our 30-day free trial and start creating documents in quick time with our low/no code solutions.
New single interface to replace 2 separate dialog boxes
If you've just discovered us, we're excited. Learn more about Windward document automation software now.
Try Windward with our 30-day free trial and start creating documents in quick time with our low/no code solutions.
Displays of all the tags in the template, structured as they are placed in the template. This provides a simple & intuitive way to see the structure of your template. Also provides the capability to go to any tag and/or see the properties of any tag.
If you've just discovered us, we're excited. Learn more about Windward document automation software now.
Try Windward with our 30-day free trial and start creating documents in quick time with our low/no code solutions.
The ability to integrate the Windward Engine into Google’s cloud computing platform for developing and hosting web applications dubbed Google Applications Engine (GAE).
If you've just discovered us, we're excited. Learn more about Windward document automation software now.
Try Windward with our 30-day free trial and start creating documents in quick time with our low/no code solutions.
If you've just discovered us, we're excited. Learn more about Windward document automation software now.
Try Windward with our 30-day free trial and start creating documents in quick time with our low/no code solutions.
This new integration will allow for processing of complex scripts and bi-directional text such as Arabic. Your PDF output will be much tighter and more closely match your template, and we’ll be able to respond rapidly to PDF requests and fixes.
If you've just discovered us, we're excited. Learn more about Windward document automation software now.
Try Windward with our 30-day free trial and start creating documents in quick time with our low/no code solutions.
Includes support for new ForEach and slide break handling, table header row repeat across slide breaks, and native Microsoft support for charts and images.
If you've just discovered us, we're excited. Learn more about Windward document automation software now.
Try Windward with our 30-day free trial and start creating documents in quick time with our low/no code solutions.
Tags are color coded in the template by type, making it easy to visually identify them.
If you've just discovered us, we're excited. Learn more about Windward document automation software now.
Try Windward with our 30-day free trial and start creating documents in quick time with our low/no code solutions.
Version 13’s core code has been reworked and optimized to offer a reduced memory footprint, faster PDF generation and full documentation of supported features and limitations in the specifications for DOCX, XLSX and PPTX.
If you've just discovered us, we're excited. Learn more about Windward document automation software now.
Try Windward with our 30-day free trial and start creating documents in quick time with our low/no code solutions.
Documents can include advanced Word image properties such as shadows, borders, and styles.
If you've just discovered us, we're excited. Learn more about Windward document automation software now.
Try Windward with our 30-day free trial and start creating documents in quick time with our low/no code solutions.
Windward has updated HTML output to reflect changing HTML standards.
If you've just discovered us, we're excited. Learn more about Windward document automation software now.
Try Windward with our 30-day free trial and start creating documents in quick time with our low/no code solutions.
Windward now works with a slew of new datasources: MongoDB, JSON, Cassandra, OData, Salesforce.com
If you've just discovered us, we're excited. Learn more about Windward document automation software now.
Try Windward with our 30-day free trial and start creating documents in quick time with our low/no code solutions.
The Generate Code tool in the designer allows you to open an existing template and, with a click of a button, automatically create a window with the code needed to run your current template with all data sources and variables. Simply copy this code and paste into your application's code in the appropriate place. You now have Windward integrated into your application.
You only need to do this once. You do not do this for each template. Instead, where it has explicit files for the template and output, change that to parameters you pass to this code. Same for the parameters passed to Windward. This example uses explicit values to show you what to substitute in where.
Any pivot tables in an XLSX template are carried over to the XLSX output. The ranges in the pivot ranges are adjusted to match the generated output. So your final XLSX will have pivot tables set as expected in the generated file.
This makes creating an XLSX workbook with pivot tables trivial.
In an imported sub-template, if its properties for a style (ex. Normal) differ from the parent template's properties for the style, the use in the sub-template can be set to either use the properties in the sub-template, or the properties in the parent.
You set to retain when you don't want the child template's styling to change when imported. You set to use the parent when you want the styling of the imported template to match the styling in the parent.
Any explicit styling is always retained. This only impacts styling set by styles.
Tags can be placed in text boxes. Including linked text boxes. This gives you the ability to set the text in a textbox from your data.
Tags can be placed in shapes & smart art. This gives you the ability to set the text in a shape from your data.
When generating HTML output, the engine can either write bitmaps as distinct files the generate HTML references, or it can embed the images in the HTML providing a single file for the output.
You can place tags in pretty much any part of a template, including in footnotes & endnotes.
Any parts of a DOCX or XLSX (PowerPoint does not support this) file that are locked in the template, will be locked the same in the output.
If a font used in the template does not exist on the server generating a report, the font to substitute can be specified.
In addition, if a glyph to be rendered does not exist in the font specified, you can specify the replacement font. This can be set distinctly for European, Bi-Directional, and Far East fonts.
If you need this - it's essential. And if you don't need it, it's irrelevant.
Windward enables you to build a document by applying multiple datasources to the template simultaneously. When Windward is merging the data into a template, it processes the template by handling each tag in order, and each tag pulls from different datasources. (As opposed to processing all of one datasource, then processing the next.)
This allows the select tag to use data from another datasource in its select. For example, if you are pulling customer information from one data source, you can then pull data from the sales datasource using the customer ID of the customer presently processing to pull the sales information for that customer. If you're interested in patching together your data from multiple datasources, read this post on our blog.


